
All Among Us Tasks (List, Faking Tasks, Visual Tasks, Common Tasks, More!)
All Among Us Tasks (List, Faking Tasks, Visual Tasks, Common Tasks, More!)
Among Us is a fun online game played by Millions. One part of Among Us I really enjoy is the completing the various tasks. Since there are so many tasks, learning about all of them will surely be helpful to your game-play. ![]()
Please leave a comment if you learned something new and/or have more to add on about tasks!
What are Among Us Tasks?
In the game of Among Us, the main objective of the Crewmates Team is to complete all of their tasks they’ve been assigned to. If all tasks are completed, the Crewmates win the game. Even as a ghost, tasks are crucial to complete.
There are 4 variations of tasks to complete. These are, Common Tasks, Short Tasks, Visual Tasks, & Long Tasks. Tasks are sorted into these categories and the Game Host can change the settings of how many of “each task variation” the Crewmates have to do.
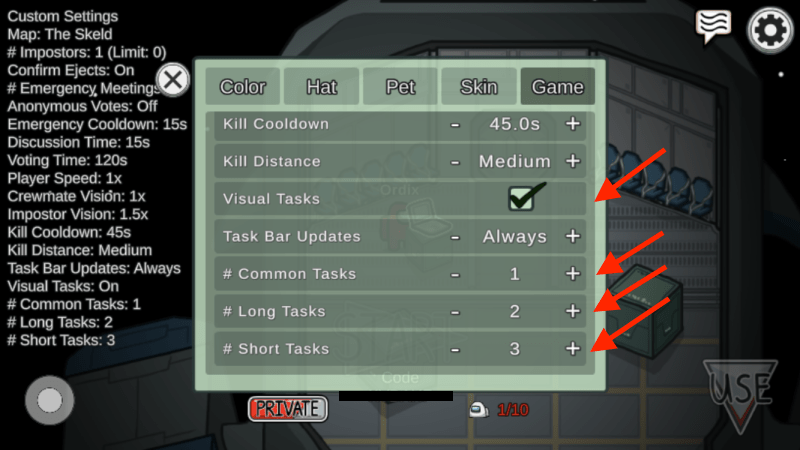
Each Among Us Map has a unique set of tasks as well. Depending on which map you are playing on, you’ll get different tasks of each category.
How to Fake a Task as an Imposter in Among Us
When you become an Imposter in Among Us, you need to blend in with the Crewmates or else they will find out it’s you. Faking Tasks is a crucial part to fitting in. If you fake tasks in the best way possible, it’ll be harder for the Crewmates to predict that you are the Imposter.
First, pay attention to the Task Bar on top. Every time a task is fully completed the task bar moves up. If you leave a task and the task bar does not go up, that seems suspicious to the Crewmates.
For the Skeld Map, some of the best tasks to fake are,
- Swipe Card (2 Seconds)
- Download, Upload Data (9 Seconds Each)
- Navigation Tasks (All around 3 Seconds to Complete)
- Clean O2 Filter (5 Seconds)
- Fuel Engines (6 Seconds Each)
For the Mira HQ Map, some of the best tasks to fake are,
- Vending Machine Task (7 Seconds)
- Empty Garbage (5 Seconds)
- Weather Balloons (7 Seconds)
- Clean O2 Filter (5 Seconds)
For the Polus Map, some of the best tasks to fake are,
- Telescope (5 Seconds)
- Water Wheels (10 Seconds each)
- Jugs (7 seconds)
For The Airship Map, some of the best tasks to fake are,
- Download, Upload Data (9 Seconds Each)
- Cockpit Steering (5 Seconds)
- Polish Ruby (5 Seconds)
- Put Away Rifles (3 Seconds)
- Put Away Pistols (3 Seconds)
Additionally, keep in mind to NEVER fake visual tasks.
Common Tasks
Every Among Us game has a set of Common Tasks. Each player in Among Us will have to complete the Common Tasks. The Common Tasks will also appear in the Imposter’s Fake task List so that the Imposter knows.
For example, if someone has the common task of “fix wiring”, every player in the game will have that task.
1. Fix Wiring. The Fix Wiring Common Task is available in the maps, The Skeld, Mira HQ, The Airship & Polus.
For this task, you want to match each wire up with their corresponding color.
2. Swipe Card. The Swipe Card Common Task is available in the maps, The Skeld & Polus.
To complete this task, you’ll first have to click on the card to get it out of your wallet. Next, you will want to swipe your card. Swipe your card until you swipe it at the perfect speed and your task will be completed.
3. Enter ID Code. The Enter ID Code Common Task is available in the maps, Mira HQ & The Airship.
In order to complete this task, you’ll have to first take out your ID card from your wallet. Then, simply type in the ID Code you see.
4. Scan Boarding Pass. The Scan Boarding Pass Common Task is available in the map Polus.
To complete this task, you’ll first have to press the yellow arrow to get the boarding pass. Next, you’ll have to press the large yellow arrow to flip your boarding pass over. Lastly, drag your boarding pass on top of the red scanner. Once it turns green, the task is complete.
5. Insert Keys. The Insert Keys Common Task is available on the map Polus.
This task is done by dragging your key into your designated lock. Your lock will be highlighted. Then all you have to do is rotate your key 90 degrees for completion.
Short Tasks
Among Us Short Tasks and Long Tasks come hand in hand. There are often a set of Short Tasks that go along with their fellow Long Tasks. Other times, short tasks are simply tasks that do not take long to finish. The short tasks are…
1. Upload Data. The Upload Data task is a Short Task in the maps, The Skeld & The Airship.
After Downloading Data, you will have to Upload Data.
2. Divert Power. The Divert Power task is a Short Task in the maps, The Skeld and Mira HQ.
To complete this task, you’ll simply have to pull the switch of the lighted lever.
3. Empty Garbage. The Empty Garbage task is a Short Task in the maps, Mira HQ and Polus.
For the Empty Garbage task, you’ll simply pull down a lever to let the Garbage Fall into a Trash Shoot. Once all the trash has been emptied, the task is complete.
4. Submit Scan. The Submit Scan task is a Short Task in the map Polus.
Simply hop on the Submit Scan and let it scan you until completion. The Submit Scan lasts roughly 10 seconds. Also, note that the Submit Scan is a Visual task as well. Other players can verify you doing this task.
5. Calibrate Distributor. The Calibrate Distributor Task is a Short Task in the maps, The Skeld & The Airship.
To complete the Calibrate Distributor Task, clear-cut timing is needed. When the rotating Node aligns with the right-hand wires, click the bar shaped button. The longer you wait, the slower the Node rotates. You will have to align 3 nodes to complete this task. If you make a mistake in alignment, you’ll sadly have to start over. This task can get frustrating at times.
6. Fix Weather Node. The Fix Weather Node task is a Short Task in the map Polus.
This Short Task will be completed by either switching on Node_CA or Node_MLG.
7. Clear Asteroids. The Clear Asteroids task in a Short Task in the map Polus.
For this task you’ll have to destroy a total of 20 Asteroids by shooting them.
8. Fuel Engines. The Fuel Engines Task is a Short Task in the map Mira HQ.
All you must do for this task is hold the Square Button until the gas is completely filled.
9. Align Telescope. The Align Telescope Task is a Short Task in the map Polus.
For this task, you will have to search for a certain Space Object to align your telescope with.
10. Assemble Artifact. The Assemble Artifact Task is a Short Task in the map Mira HQ.
To complete this task, you must piece together the shattered gem fragments.
11. Buy Beverage. The Buy Beverage task is a Short Task in the map Mira HQ.
You will get a drawing of a certain beverage for this task. All you have to do is type in the number and letter of the corresponding beverage into the machine. This works just like a Standard U.S. Vending Machine.
12. Chart Course. The Chart Course task is a Short Task in the maps, The Skeld, Mira HQ, and Polus.
To complete this task, drag the ship across all 4 points. Simple as that.
13. Clean O2 Filter. The Clean O2 Filter Task is a Short Task in the maps, Mira HQ & The Skeld.
Drag 6 leaves into a trash shoot to make the air clean.
14. Clean Toilet. The Clean Toilet Task is a Short Task in The Airship Map.
For this task, you’ll need to rapidly move a plunger up and down to keep the pressure up. This task will appear in a random bathroom stall.
15. Decontaminate. The Decontaminate Task is a Short Task in The Airship Map.
For this task, you’ll step into a shower stall and stay their until you are completely clean.
16. Dress Mannequin. The Dress Mannequin Task is a Short Task in The Airship Map.
You will have to dress a Mannequin to replicate a certain styled Among Us Character given.
17. Fill Canisters. The Fill Canisters Task is a Short Task in the map Polus.
To complete this task, you will have to drag a Canister into an Airway until it’s filled up with air. After 2 times of doing this, the task is complete.
18. Fix Shower. The Fix Shower Task is a Short Task in The Airship Map.
In a Shower Stall, the leftmost Shower head will be bent. Your job is to hammer this shower head until it is facing forward.
19. Pick Up Towels. The Pick Up Towels Task is a Short Task in The Airship Map.
Drag 8 Different towels into a Hamper to complete this task.
20. Polish Ruby. The Polish Ruby Task is a Short Task in the Airship Map.
Drag your curser/finger over the scraped parts of a Ruby. The task is complete when the Ruby becomes unscathed.
21. Prime Shields. The Prime Shields Task is a Short Task in the maps, Mira HQ & The Skeld.
Click on every red hexagon to complete this task.
22. Process Data. The Process Data Task is a Short Task in the map Mira HQ.
Simply, Process the Files Data. This task takes about 10 seconds.
23. Put Away Pistols. The Put Away Pistols Task is a Short Task in the Airship Map.
Grab the Pistols and put them on the Pistol Rack.
24. Put Away Rifles. The Put Away Rifles Task is a Short Task in the Airship Map.
Grab the Rifles and put them on the Rifle Rack.
25. Make Burger. The Make Burger Task is a Short Task in the Airship Map.
A Drawing of a Burger will be shown. You must replicate the burger perfectly with the ingredients you have to complete this task.
26. Measure Weather. The Measure Weather Task is a Short Task in the map Mira HQ.
Press the Begin Button and Weather Data will download. When the Data is done downloading, the task is complete.
27. Monitor Tree. The Monitor Tree Task is a Short Task in the map Polus.
For this task there will be 4 sections (CO2, NUTRI, RAD, & WATER). Re-adjust the sliders to align with the level requirements of each section.
28. Record Temperature. The Record Temperature Task is a Short Task in the map Polus.
On the log section, use the up and down arrows to change the temperature to match the reading temperature.
29. Repair Drill. The Repair Drill Task is a Short Task in the map Polus.
Rapidly click each of the 4 exclamation marks until they disappear. When all exclamation points are gone the task is finished.
30. Run Diagnostics. The Run Diagnostics Task is a Short Task in the map Mira HQ.
Press the Red Spacebar to begin the diagnostics. Once that process is done, pick an anomaly. You can leave this task while the diagnostics is running and come back later to pick an anomaly.
31. Sort Records. The Sort Records Task is a Short Task in The Airship Map.
Shelve all 4 File Records for this task.
32. Sort Samples. The Sort Samples Task is a Short Task in the map Mira HQ.
You’ll be given a random group of items in this task. Your job is to sort them into the right bin. There are 3 Bins, Animal Fossils, Plant Fossils, and Gems.
33. Stabilize Steering. The Stabilize Steering Task is a Short Task in the maps, The Skeld & The Airship.
All you have to do is click the middle point to complete this task.
34. Store Artifacts. The Store Artifacts Task is a Short Task in the map Polus.
For this Task you will be given 4 objects to put in a case. Place each object in the correct part of the case for completion.
35. Unlock Manifolds. The Unlock Manifolds Task is a Short Task in the maps, The Skeld, Mira HQ, & Polus.
Click each up the numbers in order from smallest to greatest. There are 10 numbers in total.
Long Tasks
In Among Us Long Tasks tend to be the most difficult type of task to complete. Many Long Tasks go hand in hand with Short Tasks as well. Sometimes, long tasks have longer durations, waiting times, or longer distances to travel. All of the Long Tasks are…
1. Align Engine Output. The Align Engine Output Task is a Long Task in The Skeld Map.
To complete this task you must align the engine with the middle line.
2. Calibrate Distributor. The Calibrate Distributor Task is considered a Long Task in The Airship Map.
To complete the Calibrate Distributor Task, clear-cut timing is needed. When the rotating Node aligns with the right-hand wires, click the bar shaped button. The longer you wait, the slower the Node rotates. You will have to align 3 nodes to complete this task. If you make a mistake in alignment, you’ll sadly have to start over. This task can get frustrating at times.
3. Clear Asteroids. The Clear Asteroids Task is a Long Task in the maps, The Skeld & Mira HQ.
For this task you’ll have to destroy a total of 20 Asteroids by shooting them.
4. Develop Photos. The Develop Photos Task is a Long Task in The Airship Map.
For this task you will have to put 3 blank photos into a bin. Then, you will have to wait a duration of 60 seconds. During these 60 seconds you can walk around and do other tasks. Lastly, you can come back to the Develop Photos Task and take out the photos to complete.
5. Divert Power. The Divert Power Task is a Long Task in the map Mira HQ.
To complete this task, you’ll simply have to pull the switch of the lighted lever.
6. Empty Garbage. The Empty Garbage Task is a Long Task in the The Skeld & The Airship.
For the Empty Garbage task, you’ll simply pull down a lever to let the Garbage Fall into a Trash Shoot. Once all the trash has been emptied, the task is complete.
7. Fix Weather Node. The Fix Weather Node Task is considered a Long Task in the map Polus.
For this task you’ll either have to go to Weather Node_TB, Node_IRO, Node_PD, or Node_GI. Then, you’ll have to complete a maze.
8. Fuel Engines. The Fuel Engines Task is considered a Long Task in the map, The Skeld, Polus, & The Airship.
All you must do for this task is hold the Square Button until the gas is completely filled.
9. Inspect Sample. The Inspect Sample Task is a Long Task in the maps, The Skeld & Polus.
For this task, you’ll first have to press the Start Button. Then, all the samples will fill up. After, you can leave this task for 60 seconds and then come back to it. Once it has been 60 seconds, you can pick the red anomaly to complete this task.
10. Open Waterways. The Open Waterways Task is a Long Task in the map Polus.
Turn the steering wheel counter-clockwise until the water is full.
11. Reboot Wifi. The Reboot Wifi Task is a Long Task in the map Polus.
To start this task you’ll pull the lever. Then you must wait 60 seconds (during these 60 seconds you can go do other tasks). After 60 seconds, you can come back to this task and pull the lever back up to finish.
12. Replace Water Jug. The Replace Water Jug Task is considered a Long Task in the map Polus.
All you need to do for this task is hold down the red button to fill the Water Jugs up.
13. Reset Breakers. The Reset Breakers Task is a Long Task in The Airship Map.
For this task, you will need to pull the levers of 7 Breakers.
14. Rewind Tapes. The Rewind Tapes Task is a Long Task in The Airship Map.
For this task, you’ll need to rewind/fast-forward the tape to the time stamp given.
15. Start Fans. The Start Fans Task is a Long Task in the Airship Map.
First, you will be given a code for this task. Then you will have to type this code in the Ventilation from Showers.
16. Start Reactor. The Start Reactor Task is considered a Long Task in the maps, The Skeld, Mira HQ, & Polus.
This task is also known as the Simon Says Task. You will have to memorize and input 5 patterns. Each time the pattern gets harder and harder.
17. Submit Scan. The Submit Scan Task is considered a Long Task in the maps, The Skeld and Mira HQ.
Simply hop on the Submit Scan and let it scan you until completion. The Submit Scan lasts roughly 10 seconds. Also, note that the Submit Scan is a Visual task as well. Other players can verify you doing this task.
18. Upload Data. The Upload Data Task is a Long Task in the maps, Polus & The Airship.
After Downloading Data, you will have to Upload Data.
19. Water Plants. The Water Plants Task is consider a Long Task in the map Mira HQ.
The first part is to grab the watering can from the storage. Then you will have to water 4 plants in the greenhouse.
Visual Tasks
If Visual Tasks are enabled in your game’s Settings, all players can see/confirm that you’ve done a visual task (if you get a Visual Task in your list of tasks as a Crewmate).
Doing Visual Tasks in front of other players is arguably the best way to make everyone sure that you are a Crewmate. Each Visual Task has their own animation.
All of the Among Us Visual Tasks are:
- Clear Asteroids
- Empty Garbage
- Prime Shields
- Submit Scan
All Tasks for The Skeld Map
The Skeld was the first Among Us Map to come out and the first set of Among Us Tasks came out with this map as well.
This is a great map for beginners to first start playing on. The Skeld has a clean and simply style. Players are more familiar with The Skeld’s Tasks too.

All Among Us Tasks on The Skeld Map are:
- Swipe Card, Admin Location
- Upload Data, Admin Location
- Download Data, Cafeteria Location
- Empty Garbage, Cafeteria Location
- Download Data, Communications Location
- Divert Power, Communications Location
- Divert Power, Electrical Location
- Download Data, Electrical Location
- Fix Wiring, Electrical Location
- Calibrate Distributor, Electrical Location
- Align Engine Output, Engines Location
- Divert Power, Engines Location
- Submit Scan, MedBay Location
- Inspect Sample, MedBay Location
- Chart Course, Navigation Location
- Download Data, Navigation Location
- Stabilize Steering, Navigation Location
- Clean O2 Filter, O2 Location,
- Start Reactor, Reactor Location
- Unlock Manifolds, Reactor Location
- Prime Shields, Shields Location
- Divert Power, Shields Location
- Fuel Engines, Storage Location
- Clear Asteroids, Weapons Location
- Download Data, Weapons Location
All Tasks for the Mira HQ Map
The Mira HQ Map was the 2nd Among Us Map to be released. This Map looks quite different from The Skeld Map and has many different tasks.
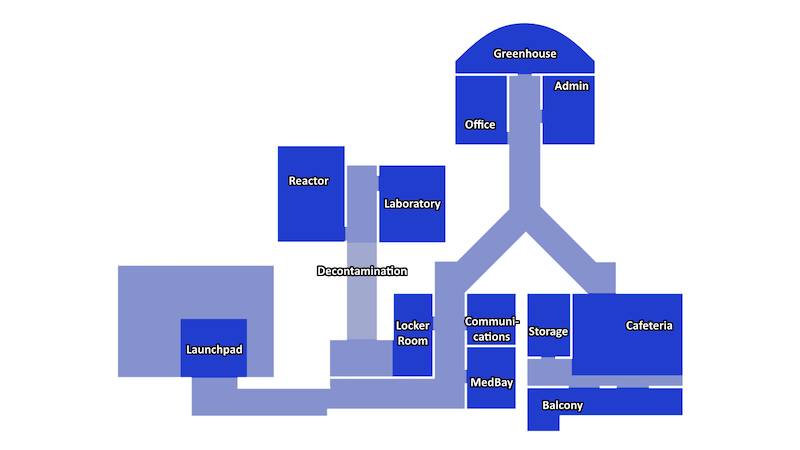
All Among Us Tasks on the Mira HQ Map are:
- Assemble Artifact, Laboratory Location
- Buy Beverage, Cafeteria Location
- Chart Course, Admin Location
- Clean O2 Filter, Greenhouse Location
- Clear Asteroids, Balcony Location
- Divert Power, Reactor, Admin, Cafeteria, Communications, Greenhouse, Laboratory, Launchpad, MedBay, & Office Locations
- Empty Garbage, Admin Location
- Enter ID Code, Admin Location
- Fix Wiring, Greenhouse, Hallway, Laboratory, Locker Room, & Storage Locations
- Fuel Engines, Launchpad Locations
- Measure Weather, Balcony Location
- Prime Shields, Admin Location
- Process Data, Office Location
- Run Diagnostics, Launchpad Location
- Start Reactor, Reactor Location
- Water Plants, Storage & Greenhouse Locations
- Unlock Manifolds, Reactor Location
- Submit Scan, MedBay Location
All Tasks for the Polus Map
The Polus Map is the 3rd Among Us Map to ever release. Something special about this map is that there are a lot of hidden places an Imposter can slay a Crewmate. The Polus Map also has its unique set of tasks.
Fun Fact: The Polus Map is a larger map than The Skeld & Mira HQ.

All Among Us Tasks on the Polus Map are:
- Open Waterways, Boiler Room Location (Below O2)
- Replace Water Jug, Boiler Room Location (Below O2)
- Reboot Wifi, Communications Location
- Chart Course, Dropship Location
- Insert Keys, Dropship Location
- Upload Data, Electrical Location
- Fix Wiring, Electrical Location
- Repair Drill, Laboratory Location
- Align Telescope, Laboratory Location
- Record Temperature, Laboratory Location
- Submit Scan, MedBay Location
- Inspect Sample, MedBay Location
- Upload Data, O2 Location
- Empty Garbage, O2 Location
- Monitor Tree, O2 Location
- Fill Canisters, O2 Location
- Swipe Card, Office Location
- Upload Data, Office Location
- Scan Boarding Pass, Office Location
- Fix Weather Node, Outside Location
- Record Temperature, Outside Location
- Start Reactor, Specimen Room Location
- Upload Data, Specimen Room Location
- Unlock Manifolds, Specimen Room Location
- Store Artifacts, Specimen Room Location
- Fuel Engines, Storage Location
- Clear Asteroids, Weapons Location
- Upload Data, Weapons Location
All Tasks for The Airship Map
The Airship Map was the 4th map released by Among Us.
This Map is so unique with plenty of more new tasks.

All Among Us Tasks on The Airship Map are:
- Put Away Pistols, Armory Location
- Put Away Rifles, Armory Location
- Upload Data, Brig Location
- Fuel Engines, Cargo Bay Location
- Unlock Safe, Cargo Bay Location
- Stabilize Steering, Cockpit Location
- Accept Power From Electrical, Cockpit Location
- Upload Data, Communications Location
- Divert Power, Electrical Location
- Calibrate Distributor, Electrical Location
- Reset Breakers, Electrical Location
- Fix Wiring, Engine Room Location
- Upload Data, Gap Room Location
- Make Burger, Kitchen Location
- Empty Garbage, Kitchen Location
- Fix Wiring, Lounge Location
- Clean Toilet, Lounge Location
- Fix Wiring, Main Hall Location
- Empty Garbage, Main Hall Location
- Develop Photos, Main Hall Location
- Decontaminate, Main Hall Location
- Empty Garbage, Medical Location
- Upload Data, Medical Location
- Enter ID Code, Meeting Room Location
- Empty Garbage Chute, Meeting Room Location
- Upload Data, Records Location
- Sort Records, Records Location
- Rewind Tapes, Security Location
- Fix Wiring, Showers Location
- Pick Up Towels, Showers Location
- Fix Showers, Showers Location
- Fix Wiring, Vault Location
- Upload Data, Vault Location
- Dress Mannequin, Vault Location
- Polish Ruby, Vault Location
- Start Fans, Ventilation Location
- Fix Wiring, Viewing Deck Location
- Upload Data, Viewing Deck Location
If you’ve found this post helpful, have any questions, suggestions, or problems at all, please feel free to comment below.




















 Protected by Patchstack
Recent Comments